User Manual for SA-ES827 Embedded Zinc Alloy Fingerprint Lock with Graffiti Design
User Manual for A-ES800 Series Fingerprint Bluetooth Cabinet Locks
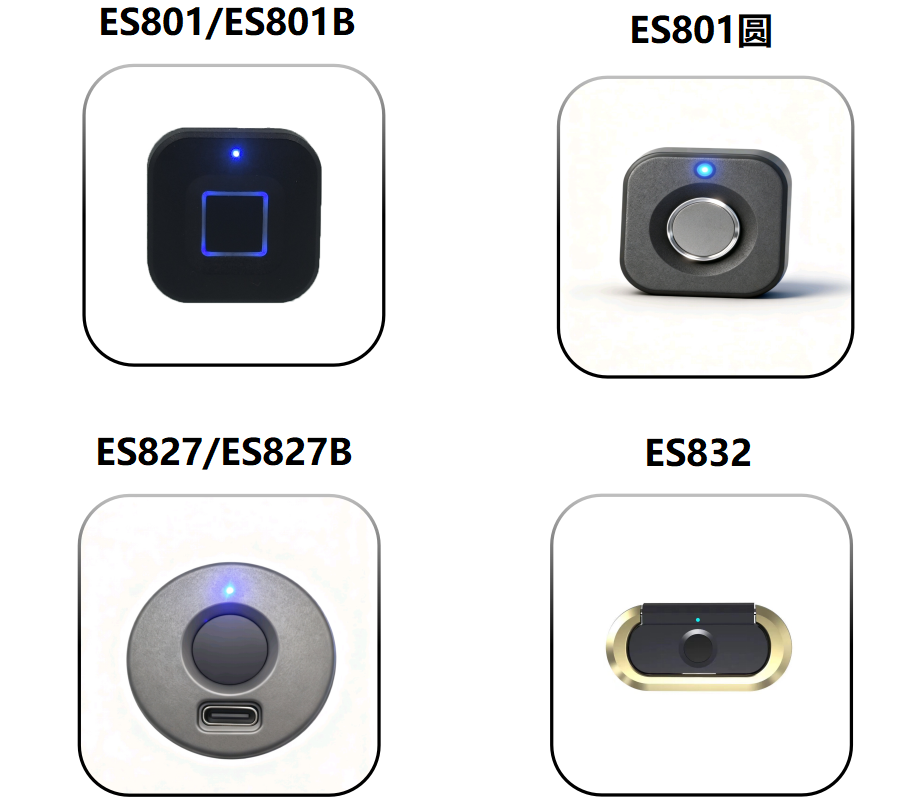
Model No.:
1. Models ES801B and ES827B support fingerprint, doodle and Bluetooth functions.
2. Models ES801, ES801 Round, ES805, ES827 and ES832 are single-fingerprint versions without fingerprint and Bluetooth functions.
Product Installation Tips
### Notes:
1. After receiving the product, it is recommended to install the batteries and connect the wires first before formal installation. Conduct a quick test on the basic functions of the product, including checking if the latch bolt retracts and extends normally, if fingerprints can be enrolled smoothly, and if Bluetooth connects properly.
2. Complete all settings prior to installation. This helps avoid wasting installation time due to faults discovered after the product is mounted.
3. Install the buckle first, then the lock body, and align the lock body according to the position of the buckle. The buckle is designed for concealed installation. If reinstallation is needed due to installation errors, the product appearance will not be affected. However, repositioning the lock body may damage its exterior look.
### Product Operation Instructions
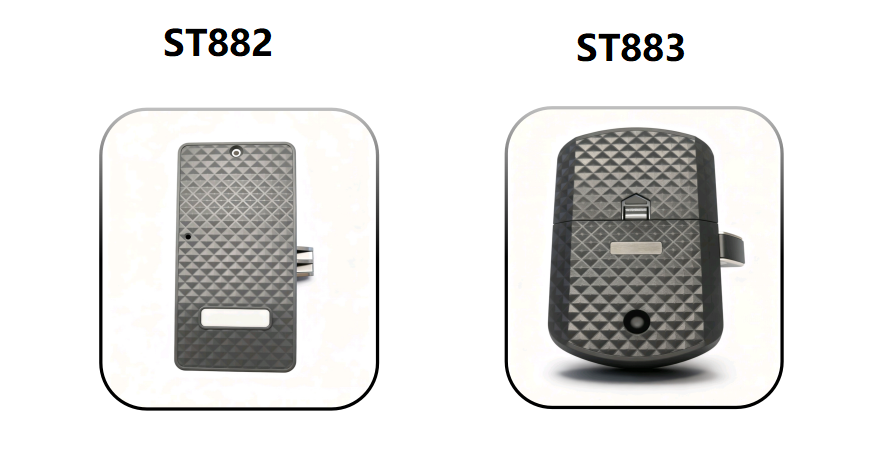
To accommodate different usage habits, models ES801B and ES827B support local management and mobile Tuya Bluetooth management. Models ES801, ES801 Round, ES827, ES832 and ES833 only support local functions. Relevant instructions are detailed below.
The product is set to Demo Mode by default after initialization. In Demo Mode, any fingerprint can unlock the lock.
#### Local Operation Instructions
The product is set to Demo Mode by default after initialization. In Demo Mode, any fingerprint can unlock the lock.
1. Light Indications:
- Successful fingerprint verification (factory default state): The blue indicator light flashes once.
- Successful fingerprint verification: The green indicator light flashes once.
- Failed fingerprint verification: The red indicator light flashes 2 to 3 times.
- Restore factory settings via Morse code: The green light turns on, then switches to the blue light.
- Low battery alert: After successful fingerprint verification, the green light flashes once followed by three red light flashes to indicate insufficient power.
- Enrollment timeout: The red indicator light flashes once.
- Reset timeout: The red indicator light flashes twice.
2. Fingerprint Enrollment
The enrollment process will exit automatically if a timeout occurs, and you will need to restart the operation. A single red light flash signals an enrollment timeout. (Note: Two fingerprints will be enrolled by default for the first enrollment.)
2.1 Press and hold your finger until the sky-blue (blue) light stays on, then lift your finger. (Note: For models with Tuya Bluetooth function, Bluetooth broadcasting will be activated for 90 seconds once the sky-blue light is on, allowing Bluetooth connection.)
2.2 Start fingerprint enrollment. (Note: ES827B and ES833 have a default of 5 enrollment attempts; ES801 Round has a default of 6 enrollment attempts.)
2.3 Lift and press your finger ten times continuously. The green light will turn on to indicate successful enrollment of the first fingerprint. (Note: ES827B and ES833 have a default of 5 attempts for the first fingerprint; ES801 Round has a default of 6 attempts for the first fingerprint.)
2.4 After the first fingerprint is enrolled successfully, the blue light will turn on. Switch to another finger and repeat the lifting and pressing action ten times continuously. The green light will light up to confirm successful enrollment of the second fingerprint. (Note: ES801 Round has a default of 6 attempts for the second fingerprint; ES833 has a default of 5 attempts for the second fingerprint.)
(Note: Lift your finger after each press during enrollment; do not keep your finger pressed down. Move your finger up, down, left and right while enrolling, to avoid pressing the same part of your finger for all ten attempts.)
3. Add a new fingerprint:
3.1 Use a registered finger to complete verification, then keep pressing until the sky-blue/blue-green light turns on, and lift your finger;
3.2 Start enrolling a new fingerprint. Lift and press your finger ten times continuously. The green light indicates successful registration of the new fingerprint. (Note: ES827B and ES833 default to 5 registration attempts; the round-style ES801 defaults to 6 registration attempts.)
Video tutorial on adding more fingerprints:
4. Use of Morse Code: (After restoring factory settings, all fingerprints cannot be recovered.)
4.1 Restore factory settings via Morse Code
a. After fingerprint verification succeeds, keep pressing until the blue and green lights turn on (do not lift your finger during pressing);
b. Continue pressing when the white light turns on (do not lift your finger);
c. Release your finger once the red light lights up. A single flash of the green light indicates all fingerprints have been cleared and factory settings are restored successfully.
4.2 Set the emergency password
a. Unlock the lock with your fingerprint and keep pressing until the blue light turns on (do not lift your finger), then release your finger when the white light comes on.
b. The green light will turn on after you release your finger. Each fingerprint press counts as one digit (for example, five presses represent the number 5). After pressing the set number of times, wait for the blue light to turn on.
c. When the blue light is on, press your finger the preset number of times (for example, six presses represent the number 6), then wait for all lights to turn off.
d. The number entered with the green light and the number entered with the blue light combine to form a two-digit password (e.g. 56). Please remember your password.
4.3 Use the emergency password
a. If the fingerprint fails to unlock the lock normally, press and hold any registered fingerprint until the white light flashes, then release your finger.
b. The green light will turn on afterwards. Press your finger the previously set number of times (e.g. 5 times), then wait for the blue light to light up.
c. When the blue light is on, press your finger the preset number of times (e.g. 6 times), then wait for the lights to go out.
d. If the red light flashes before the lights turn off, the password is incorrect; if the green light flashes, the password is correct.
e. Once the password is verified, the lock will open automatically and revert to factory settings. You will need to register fingerprints again.
Demonstration of how to use the emergency password:
### 4.4 Notes on Using Morse Code:
a. If no emergency unlock password has been set, the default password is 33. If a password has been set, the default password will no longer be valid.
b. After restoring factory settings, all customized passwords will become invalid and the system will revert to the default password.
c. The system will exit automatically if there is a timeout during the setup or use of the emergency unlock password, and you will need to start over. A single red light flash indicates a timeout during password setup, while two red light flashes signal a timeout during password use.
### Bluetooth Connection Instructions
This product is compatible with the Tuya App. Search for "Tuya Smart" in the app store or scan the QR code in the figure on the right to download the app, then follow the prompts to register an account.

If you are using it abroad, please search for "SMARTLIFE" to download and use it.

1. Device Adding Process
Download Smart Life APP / Tuya Smart APP from your mobile app store → Open Smart Life / SMARTLIFE APP and tap Add Device → "Long press the fingerprint recognition area until the sky-blue indicator light turns on (you can register fingerprints once the light is lit) to activate the pairing broadcast" → Tap Add after the device is detected → Return to the APP homepage upon completion.

Bluetooth Connection Video Demo for APP:
2. Add fingerprint users; Delete fingerprint users
a. On the main page of the APP, click in sequence: Member Management → Me → Add Fingerprint. When the blue light stays on, start fingerprint enrollment. Press the fingerprint continuously for 5 times (the ES801B defaults to 10 times). The green light will turn on to indicate that the fingerprint enrollment is completed. Slightly move your finger up, down, left and right within a small range during enrollment.

b. On the main page of the APP, tap Member Management → Me → Fingerprint in sequence, then select Delete.

Video Demonstration: How to Delete Fingerprints via the App
3. More Settings:
Remote unlocking will be disabled after being turned off, and unlocking via the gateway will no longer be available. 2. Sensor calibration

4、恢复出厂设置 :(注:“需要在手机蓝牙与设备连接状态下进行解绑”,清除数据后所有指纹不可恢复。)

如何使用APP恢复出厂设置视频演示: